
BridgeLink Quick Start Guide Windows
For New Installations of BridgeLink 26.9.0
About This Guide
BridgeLink is Innovar Healthcare's integration platform. It moves messages between the systems in your organization and lets you build, run and watch those connections, called channels, from a web browser.
The steps here take one Windows server from download to a running BridgeLink 26.9.0 server that you manage in WebAdmin.
If you would like a hand with any part of the install, Innovar Healthcare's professional services team can help with as much or as little of it as you want.
What You Install
| Piece | What it is | Runs as | Default port |
|---|---|---|---|
| BridgeLink server | The integration platform itself: your channels and the service that runs them | The Windows service BridgeLink Service, under the virtual account NT SERVICE\blservice unless you choose another account | 8443 (HTTPS) and 8080 (HTTP) |
| WebAdmin | The browser-based tool you use to manage the server | The Windows service BridgeLinkWebAdmin, under the LocalSystem account | 8444 (HTTPS) |
| Database | Where BridgeLink keeps channels, messages, events, users and settings | Your own PostgreSQL, MySQL, SQL Server or Oracle database | Set by your database |
HTTPS is the encrypted form of a web connection.
Open port 8443 on the BridgeLink server to other machines only if WebAdmin runs on another machine or other programs call the BridgeLink API. Channels that listen for connections, such as MLLP or HTTP listeners, need their own ports opened. Port 8080 is BridgeLink's plain-HTTP port; nothing in this guide uses it, so keep it closed to other machines.
Decide These First
- Which database BridgeLink uses. Use your own external database, not the default Derby database. See Choosing and Connecting the Database. Have an empty database and a login for BridgeLink ready before you install.
- Which Windows account runs the BridgeLink service. The installer's default is a built-in virtual account,
NT SERVICE\blservice, which needs no preparation. You need an account of your own only if BridgeLink must reach domain resources, such as SQL Server with Windows authentication or a shared folder on another server. See The Service Account. - Which ports BridgeLink and WebAdmin use. Browsers reach WebAdmin on
8444. WebAdmin reaches BridgeLink on8443.
Requirements
- A 64-bit Windows server. WebAdmin needs 64-bit Windows 10 or later, including the Windows Server editions built on the same platform version.
- An account with administrator rights, to run the two installers. This is not the account the service runs as.
- A 64-bit Java runtime, installed on the server before you run the BridgeLink installer. The installer does not include Java. See Before You Run the Installer for the versions to use.
- An external database server with an empty database for BridgeLink
- A current browser for WebAdmin: Chrome, Edge or Firefox 120 or later, or Safari 17 or later
Getting the Software
BridgeLink downloads are on the BridgeLink website. Customers with an Innovar Healthcare customer portal account can also download them from the portal.
- Open
https://www.bridgelink.net/downloadin a browser. - Select Windows.
- Find the BridgeLink Server card and confirm it shows version
26.9.0. - Click Installer (.exe) to download it.
You do not need a separate WebAdmin download for this server. The BridgeLink installer carries the WebAdmin installer and offers to run it when it finishes. The separate BridgeLink WebAdmin Standalone download is for putting WebAdmin on a different machine.
Installer, MSI or ZIP
| Package | What you get | Use it when |
|---|---|---|
| Installer (.exe) | A guided setup that runs on the Java you install first (Java 21 recommended), asks for the ports and the service account, installs BridgeLink Service, gives the service account the rights it needs, and offers to install WebAdmin at the end | Almost every install. This is the recommended package. |
| MSI package (.msi) | The same installer in MSI form | Your IT team deploys software with an MSI-based tool |
| Portable ZIP (.zip) | The BridgeLink files only: no Java and no Windows service. The WebAdmin installer is included but does not run for you | A quick evaluation, or a machine where your team manages Java and services by its own methods |
The rest of this guide follows the installer. If you choose the ZIP, see Using the Portable ZIP Instead in the next chapter.
Installing BridgeLink
Before You Run the Installer
Install a 64-bit Java 21 runtime on the server first. Java 21 is recommended: use an OpenJDK build such as Eclipse Temurin (from Adoptium), Amazon Corretto or Azul Zulu. Java 17 is also supported when BridgeLink uses an external database; the default Derby database needs Java 21. Do not install a Java newer than 21: BridgeLink 26.9 does not use one.
Check that Java is installed:
- Click Start.
- Type
cmdand pressEnter. - Run this command in Command Prompt:
java -version- Check that the output shows version 21 (or 17) and the words
64-Bit.
The BridgeLink installer does not include Java. If it cannot find one, it shows a dialog titled install4j Wizard that says it could not find a Java Runtime Environment and asks you to locate a suitable 64-bit JRE (minimum version 17, maximum version 21), with Locate and Cancel buttons. Click Cancel, install Java, and run the installer again.
By default, the installer runs BridgeLink under a built-in Windows account, NT SERVICE\blservice. Windows manages that account, it needs no password, and the installer gives it everything it needs, so most installs need no preparation.
You need an account of your own only if BridgeLink must reach network resources as a domain user, for example SQL Server with Windows authentication, or a shared folder on another server. In that case, create the account before you run the installer, for example MYDOMAIN\svc-bridgelink, where MYDOMAIN is your Windows domain's name. Do not add it to the Administrators group. The Service Account explains why.
Run the Installer
- Double-click the downloaded
BridgeLink_windows-x64_26_9_0.exefile. - If Windows asks whether to allow the app to make changes, check that the publisher is Innovar Healthcare Systems Group, Inc, then click Yes. The built-in Administrator account gets no prompt.
- On the welcome screen, click Next.
- On Select Destination Directory, keep the install folder
C:\Program Files\BridgeLink, or choose another folder. - Click Next.
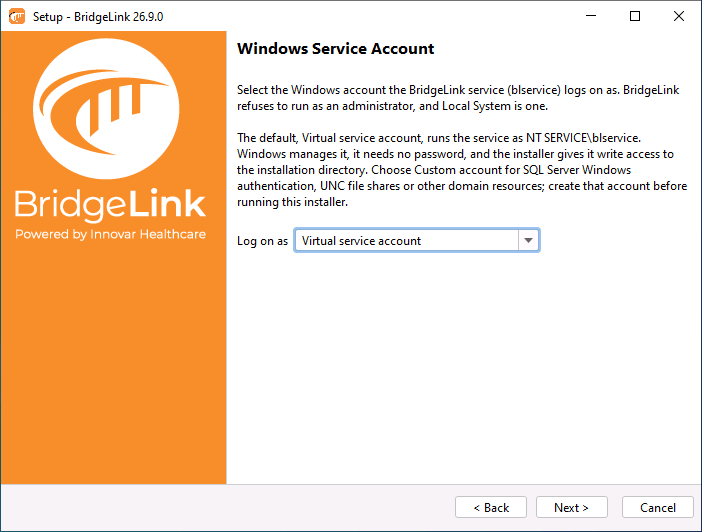
- On Windows Service Account, keep Log on as set to Virtual service account. To use an account of your own instead, choose Custom account..., then type the account in Username and its password in Password. Type a domain account as
MYDOMAIN\svc-bridgelinkand a local account as.\svc-bridgelink. A name with no.\or domain in front does not work, and neither does thename@computerform. Type the password carefully: the installer does not check it, and a wrong one only shows when BridgeLink Service fails to start with a logon error.
- Click Next.
- On BridgeLink Administrator Ports, keep Administrator Port at
8443. - Keep Web Start Port at
8080. - Click Next.
- On Install Plugins to BridgeLink, click Next. You can add plugins later.
- Wait while the files copy.
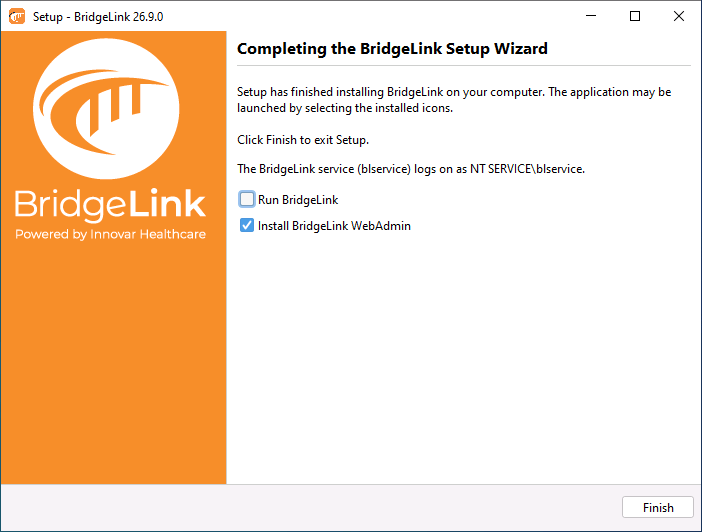
- On the last screen, clear Run BridgeLink. You connect the database before BridgeLink starts for the first time.
- Leave Install BridgeLink WebAdmin checked.
- Click Finish.
The MSI package shows the same screens in the same order.
The WebAdmin setup wizard opens next. Complete it using Run the WebAdmin Setup Wizard, then return to Choosing and Connecting the Database. You can also close the wizard and run it later. Do not sign in to WebAdmin until you finish Starting BridgeLink for the First Time.
The installer gives the account it sets up the Log on as a service right and Modify permission on the install folder. That is true for the virtual account and for your own, so you do not need to set either by hand. The last screen confirms the account, for example: The BridgeLink service (blservice) logs on as NT SERVICE\blservice. If the installer cannot set the account, the last screen shows a warning instead, and BridgeLink is left under Local System and not started. Rerun the installer with the account typed as above.
What the Installer Put on Disk
Path under C:\Program Files\BridgeLink | What it holds |
|---|---|
conf\mirth.properties | The server's main settings file, including the database connection |
appdata\ | Created on first start: the keystore (the file that holds the server's certificate), the server.id file, and the Derby database files if you use Derby |
blservice.vmoptions | The Java memory settings for BridgeLink Service (see Memory for the BridgeLink Server) |
logs\mirth.log | The server log |
BridgeLink-WebAdmin-Setup.exe | The WebAdmin installer, kept so you can run it again later |
Installing Without the Screens
To script the .exe install, open Command Prompt as an administrator and run the installer with -q (quiet) and a response file:
BridgeLink_windows-x64_26_9_0.exe -q -varfile response.varfileThe response file holds one name=value answer per line, for example:
admin_port=8443
web_port=8080
service_account_type=Virtual service account
executeLauncherAction=false
Without that line, BridgeLink starts as soon as the install finishes, before you connect the database.
For an account of your own, set service_account_type=Custom account... and add service_account_user and service_account_password. Type each backslash in the user name twice, for example service_account_user=MYDOMAIN\\svc-bridgelink or service_account_user=.\\svc-bridgelink.
A quiet install also runs the WebAdmin Setup without its screens and waits for it to finish. To skip WebAdmin, add -VinstallWebAdmin=false to the command. WebAdmin Setup writes its own log, webadmin-setup.log, in the BridgeLink install folder.
Using the Portable ZIP Instead
The ZIP has no Java, registers no service and does not run the WebAdmin wizard for you.
- Install a 64-bit Java runtime on the server (see Before You Run the Installer).
- Signed in as an administrator, extract the ZIP into
C:\Program Files. In Explorer's Extract All, set the destination to exactlyC:\Program Files, with no folder name after it. The ZIP creates the folderC:\Program Files\BridgeLink, the same folder the installer uses, so the paths in this guide apply as written. Check thatC:\Program Files\BridgeLink\confexists before you go on.
- Give the account that will run BridgeLink Modify permission on that folder (see The Service Account).
- Connect the database before the first start (see Choosing and Connecting the Database).
If you extracted the ZIP to C:\, open C:\BridgeLink\conf\mirth.properties where that chapter says C:\Program Files\BridgeLink\conf\mirth.properties, and use C:\BridgeLink in place of C:\Program Files\BridgeLink in every other path in this guide.
- Run
BridgeLink-WebAdmin-Setup.exefrom the same folder to install WebAdmin (see Installing WebAdmin). Do this now, while you are signed in as an administrator, because WebAdmin Setup needs administrator rights. - Sign in to Windows as the account that will run BridgeLink, and make sure it is not an administrator.
BridgeLink refuses to run as an administrator, but that check is a backstop and does not catch every case. For example, an administrator who runs blserver.exe from a Command Prompt that is not elevated is not refused.
- Open Command Prompt.
- Go to the BridgeLink folder:
cd "C:\Program Files\BridgeLink"- Run
blserver.exe. BridgeLink runs until you close that window.
For a server that keeps running after you sign out and restarts with Windows, use the installer instead.
Choosing and Connecting the Database
Every BridgeLink server keeps its channels, messages, events, users and settings in one database. You choose which database in conf\mirth.properties, and you make that choice before BridgeLink starts for the first time.
Use an External Database, Not Derby
BridgeLink ships set to the default Derby database. Derby needs no setup, which makes it handy for a short test. Do not use it for a server you plan to keep:
- Requires Java 21. BridgeLink 26.9 will not start a server on the default Derby database with any Java older than 21. It stops at once and writes this line to
logs\mirth.log:embedded Derby requires Java 21+ as of 26.9; upgrade Java or switch to an external database. No setting turns this check off. - Runs inside BridgeLink. Derby lives in the same process as the server, so no other tool can open the database while BridgeLink runs, and backing it up means copying its files.
- Lacks features. The default Derby database does not support the JSON value type in Lookup Manager or regex search in Message Browser. SQL Server does not support regex search either.
- Sized for evaluation. For production message volumes, use PostgreSQL, MySQL, Microsoft SQL Server or Oracle.
An external database also fits the backup, monitoring and security routines your team already runs.
Prepare the Database
- On your database server, create an empty database for BridgeLink, for example
bridgelinkdb. - Create a login for BridgeLink that owns that database and can create tables in it.
BridgeLink creates all of its tables the first time it starts. You do not run any scripts.
Point BridgeLink at the Database
- Click Start.
- Type
Notepad. - Right-click Notepad and click Run as administrator.
- In Notepad, click File, then Open.
- In File name, type
C:\Program Files\BridgeLink\conf\mirth.propertiesand click Open.
Notepad's Open dialog lists only .txt files by default, so the conf folder looks empty if you browse to it. Typing the full path in File name avoids that. If you browse instead, choose All Files in the file type list beside File name.
- Find the line
database = derbyand changederbyto the value for your database from the table below. Type the value only, for examplepostgres.
The comment line above database reads # options: derby, mysql, postgres, oracle, sqlserver. Do not copy a value from it with its comma: postgres, stops BridgeLink at startup.
- Change the
database.urlline to your database's address, using the pattern in the table. - Set
database.usernameto the BridgeLink login. - Set
database.passwordto that login's password. - Click File, then Save.
| Database | database value | database.url pattern |
|---|---|---|
| PostgreSQL | postgres | jdbc:postgresql://dbhost:5432/bridgelinkdb |
| MySQL | mysql | jdbc:mysql://dbhost:3306/bridgelinkdb |
| Microsoft SQL Server | sqlserver | jdbc:sqlserver://dbhost:1433;databaseName=bridgelinkdb |
| Oracle | oracle | jdbc:oracle:thin:@//dbhost:1521/servicename for a service name (pluggable databases), or jdbc:oracle:thin:@dbhost:1521:SID for a SID |
Replace dbhost, the port and the database name (for Oracle, the service name or SID) with your own. A finished PostgreSQL example looks like this:
database = postgres
database.url = jdbc:postgresql://db01.example.org:5432/bridgelinkdb
database.username = bridgelink
database.password = your-password-here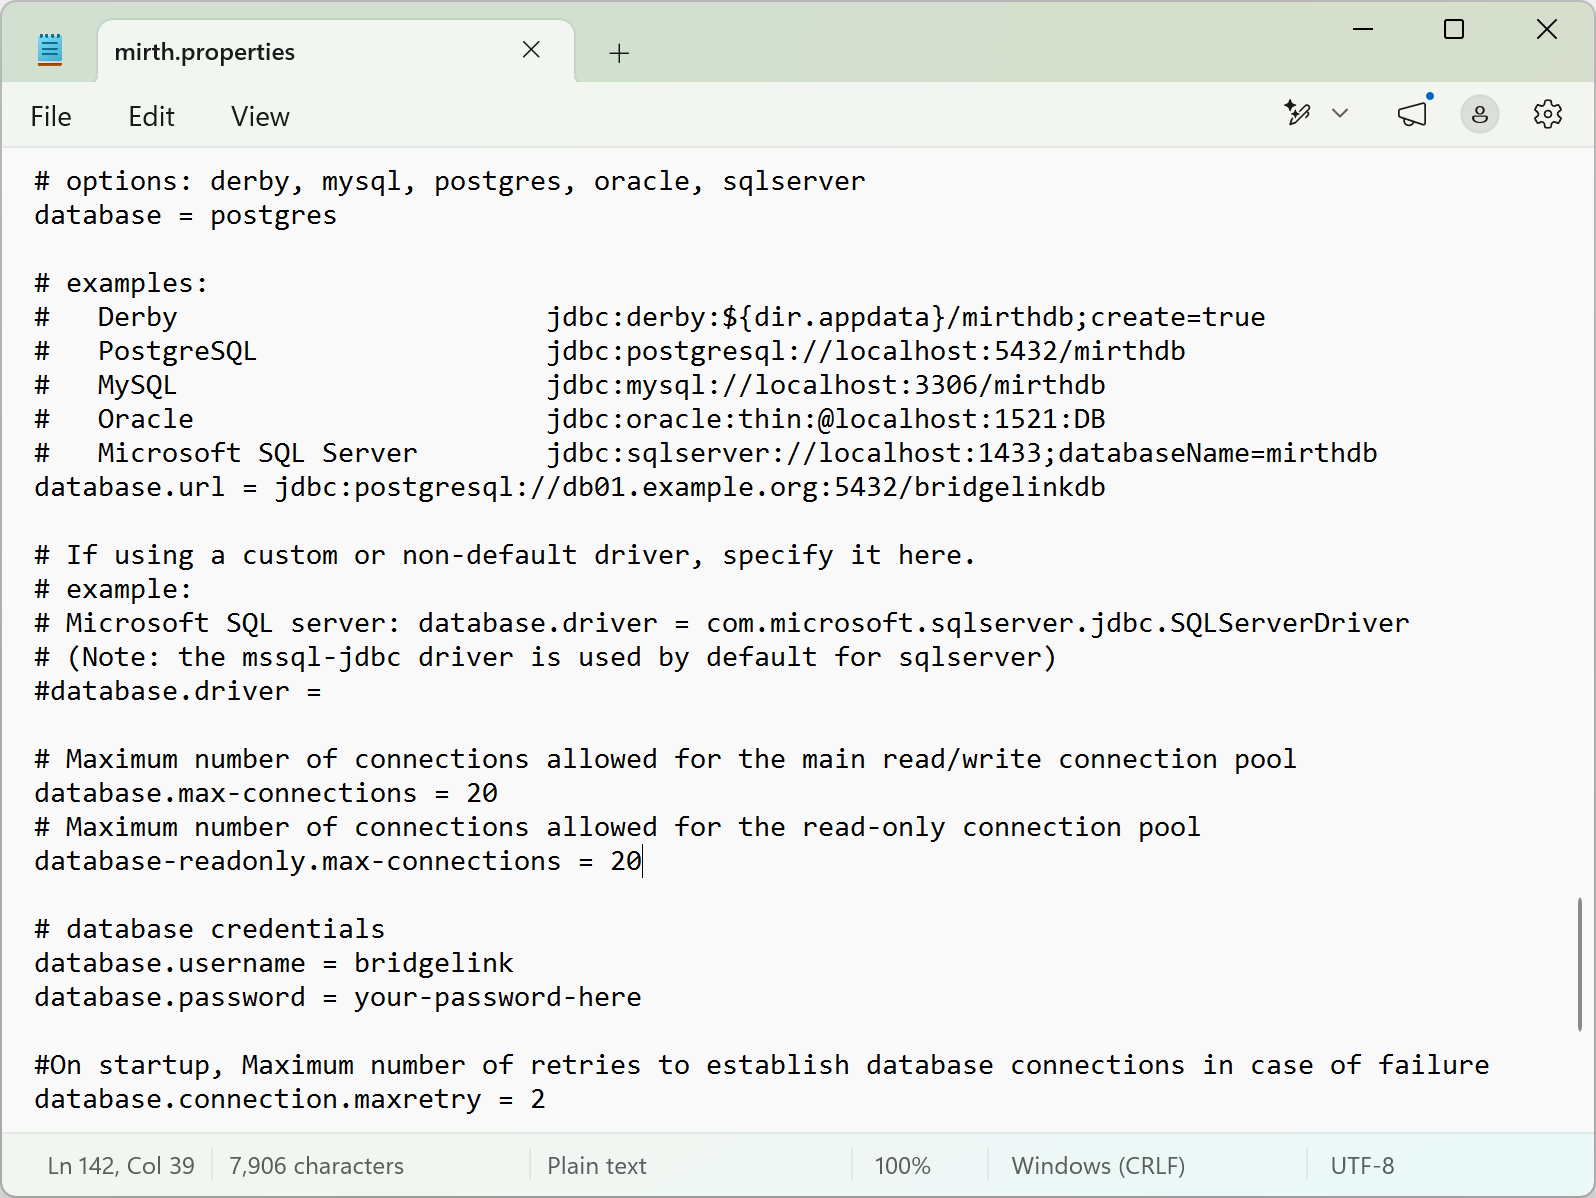
Leave the other lines as they are for now. The installer already set https.port and http.port from your answers, and the keystore lines are managed by BridgeLink.
The Service Account
BridgeLink Service runs in the background under one Windows account. That account decides what BridgeLink can reach on the machine and on your network.
Why Not an Administrator
Channels can run scripts. If the service runs as an administrator, any script in any channel has full control of the machine. So you run the service as an account that is not an administrator, and BridgeLink backs that up with a check: by default, it refuses to start when it detects that it is running as an administrator. On Windows, that covers Local System and any account in the Administrators group. The log shows:
ERROR: BridgeLink is running as root/Administrator.
The setting behind this is server.allowRoot = false in conf\mirth.properties. Leave it set to false.
Treat the check as a backstop, not a guarantee. It can miss an administrator who runs blserver.exe (the Portable ZIP) from a Command Prompt that is not elevated, and it does nothing if the Windows Server service is turned off. Choose a non-administrator account yourself instead of relying on it.
The service account needs:
- The Log on as a service right
- Modify permission on the BridgeLink install folder, because BridgeLink writes its logs, its
appdatafolder andconf\mirth.propertiesthere - Read and write access to any folders your channels read from or write to
- Network access to the database and to the systems your channels connect to
The installer grants the first two for the account it sets up, whether that is the default virtual account NT SERVICE\blservice or an account of your own. The virtual account cannot sign in to other servers as a domain user, so if your channels read from a shared folder on another server, or the database uses Windows authentication, use an account of your own. Alternatively, because the virtual account reaches the network as the computer account (MYDOMAIN\HOSTNAME$, where HOSTNAME is this server's name), you can grant that computer account access to the share or to SQL Server instead.
Check Which Account BridgeLink Runs As
- Click Start.
- Type
services.mscand pressEnter. - Find BridgeLink Service and read its Log On As column.
It should show NT SERVICE\blservice or your own service account, for example MYDOMAIN\svc-bridgelink. If it shows Local System, BridgeLink will not start; change the account as described below.
In Command Prompt, this shows the same thing on the SERVICE_START_NAME line. Use Command Prompt, not PowerShell: in PowerShell, sc is a different command (Set-Content). If you must use PowerShell, type sc.exe instead.
sc qc blserviceChanging the Account After Install
To change the account after the install, use one of the ways below.
To move the service to the virtual account, open Command Prompt (not PowerShell) as an administrator. Stop the service:
sc stop blserviceThe service takes a moment to stop. Run this command again until the STATE line shows STOPPED:
sc query blserviceThen run these commands, using your install folder. Starting before the service has stopped can fail with error 1056:
sc config blservice obj= "NT SERVICE\blservice"
icacls "C:\Program Files\BridgeLink" /grant "NT SERVICE\blservice:(OI)(CI)M"
sc start blservice
To move the service to an account of your own, first make sure the account exists. A domain account comes from your directory team. A local account is created in Computer Management, under Local Users and Groups. Then:
- Click Start.
- Type
services.mscand pressEnter. - Right-click BridgeLink Service and click Stop.
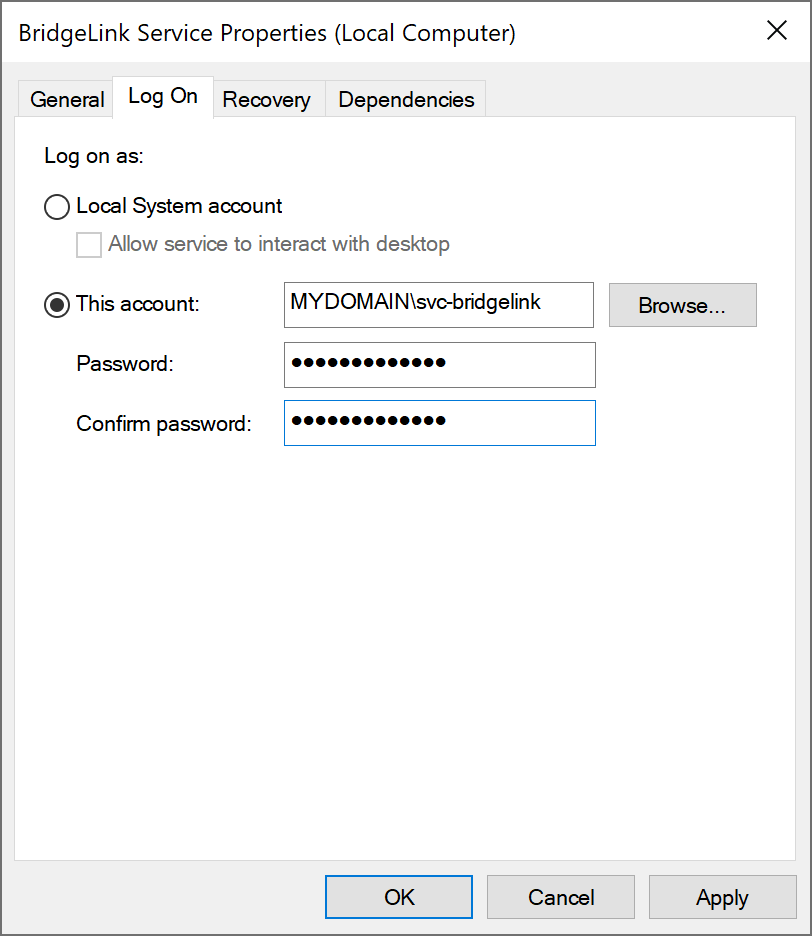
- Right-click BridgeLink Service and click Properties.
- Click the Log On tab.
- Select This account.
- Type the new account in This account, for example
MYDOMAIN\svc-bridgelink. - Type its password in Password.
- Type it again in Confirm password.
- Click OK.
- Click Start.
- Type
cmd. - Right-click Command Prompt and click Run as administrator.
- In Command Prompt, run this command, using your install folder and the new account. For a local account, leave off the domain:
svc-bridgelink:(OI)(CI)M.
icacls "C:\Program Files\BridgeLink" /grant "MYDOMAIN\svc-bridgelink:(OI)(CI)M"- Grant the new account the same access to any folders your channels use.
- In Services, right-click BridgeLink Service and click Start, or Restart if it is already running.
The (OI)(CI)M part grants Modify on the folder and everything inside it, including files BridgeLink creates later. Once the new account works, you can remove the old account's permission on the folder.
The Services console gives the account the Log on as a service right when you click OK. If you set an account of your own with a command (sc config) instead, grant that right yourself with the steps below; the command does not grant it. The virtual account needs no extra step, because Windows already lets every virtual service account log on as a service.
To grant the Log on as a service right yourself:
- Click Start.
- Type
secpol.mscand pressEnter. - Under Local Policies, click User Rights Assignment.
- Double-click Log on as a service.
- Click Add User or Group.
- In Enter the object names to select, type the account, for example
MYDOMAIN\svc-bridgelink. - Click OK.
- Click OK again to close the Log on as a service Properties dialog.
Starting BridgeLink for the First Time
Start the service once the database is connected and the service account is set.
- Click Start.
- Type
services.mscand pressEnter. - Right-click BridgeLink Service and click Start.
- Wait about a minute.
- Click Start.
- Type
Notepadand pressEnter. - In Notepad, click File, then Open.
- In File name, type
C:\Program Files\BridgeLink\logs\mirth.logand click Open. - Press
Ctrl+Endto go to the end of the file. - Find the newest line that contains
Web server running at. - Check that the time on that line is after the start you just made. That line is the sign that BridgeLink started and is listening on port
8443. - Find the newest line that contains
Running, to check the database name and Java version. - Confirm the line names your database, not
derby. It also names the Java version and the operating system.
The Web server running at line is the one to trust. If BridgeLink cannot read its keystore or write its files, the log can still show server successfully started and the Running line, but there is no Web server running at line and port 8443 refuses connections. If you do not find that line a minute or so after the start, see Troubleshooting.
On this first start, BridgeLink:
- Creates its tables in your database
- Creates the
appdatafolder - Creates a keystore (the file that holds the server's certificate) with a new self-signed certificate for port
8443, and writes new keystore passwords intoconf\mirth.properties - Creates the
appdata\server.idfile that holds this server's unique ID
BridgeLink Service is set to start with Windows from now on. If the service stops right away, see Troubleshooting.
Memory for the BridgeLink Server
BridgeLink starts with a 256 MB Java heap, which is enough for a personal or test install but small for production. To change it:
- Click Start.
- Type
Notepad. - Right-click Notepad and click Run as administrator.
- In Notepad, click File, then Open.
- In File name, type
C:\Program Files\BridgeLink\blservice.vmoptionsand click Open. - Change the
-Xmx256mline to a larger value, for example-Xmx1g. Leave memory for Windows and the database. - Click File, then Save.
- In Services, right-click BridgeLink Service and click Restart.
The Portable ZIP runs blserver.exe, which reads blserver.vmoptions in its own folder instead.
Installing WebAdmin
WebAdmin is the browser-based tool you use to manage BridgeLink. It runs as its own small service, next to BridgeLink, and nobody needs to install anything on their own computer to use it.
On Windows, WebAdmin setup is a second installer that comes inside the BridgeLink installer. When you leave Install BridgeLink WebAdmin checked and click Finish, the WebAdmin setup wizard opens. If you closed it, or used the ZIP, run BridgeLink-WebAdmin-Setup.exe from the BridgeLink install folder. The wizard does not open when the BridgeLink installer runs without its screens (a silent install), but the silent install still installs WebAdmin unless its installWebAdmin option is set to false. See Installing Without the Screens.
Run the WebAdmin Setup Wizard
- If Windows asks whether to allow the app to make changes, click Yes.
- On License Agreement, read the Business Source License 1.1, the license WebAdmin is released under.
- Select I accept the agreement.
- Click Next.
- On Supplemental Terms, read the BridgeLink WebAdmin Supplemental Terms.
- Select I accept the Supplemental Terms.
- Click Next.
- On Select Destination Location, keep
C:\Program Files\BridgeLink WebAdmin. - Click Next.
- On Select Additional Tasks, leave Install as Windows Service (auto-start at boot) checked.
- Click Next.
- On Select Start Menu Folder, keep
BridgeLink WebAdmin. The sign-in steps below use that shortcut. - Click Next.
- On Port Configuration, keep
8444. - Click Next.
- On BridgeLink Server, select Same Host (Recommended).
- Click Next.
- On BridgeLink Engine Port, check that the port is
8443, the same as Administrator Port in the BridgeLink installer. - Click Next.
- On Ready to Install, click Install.
- When it finishes, click Finish.
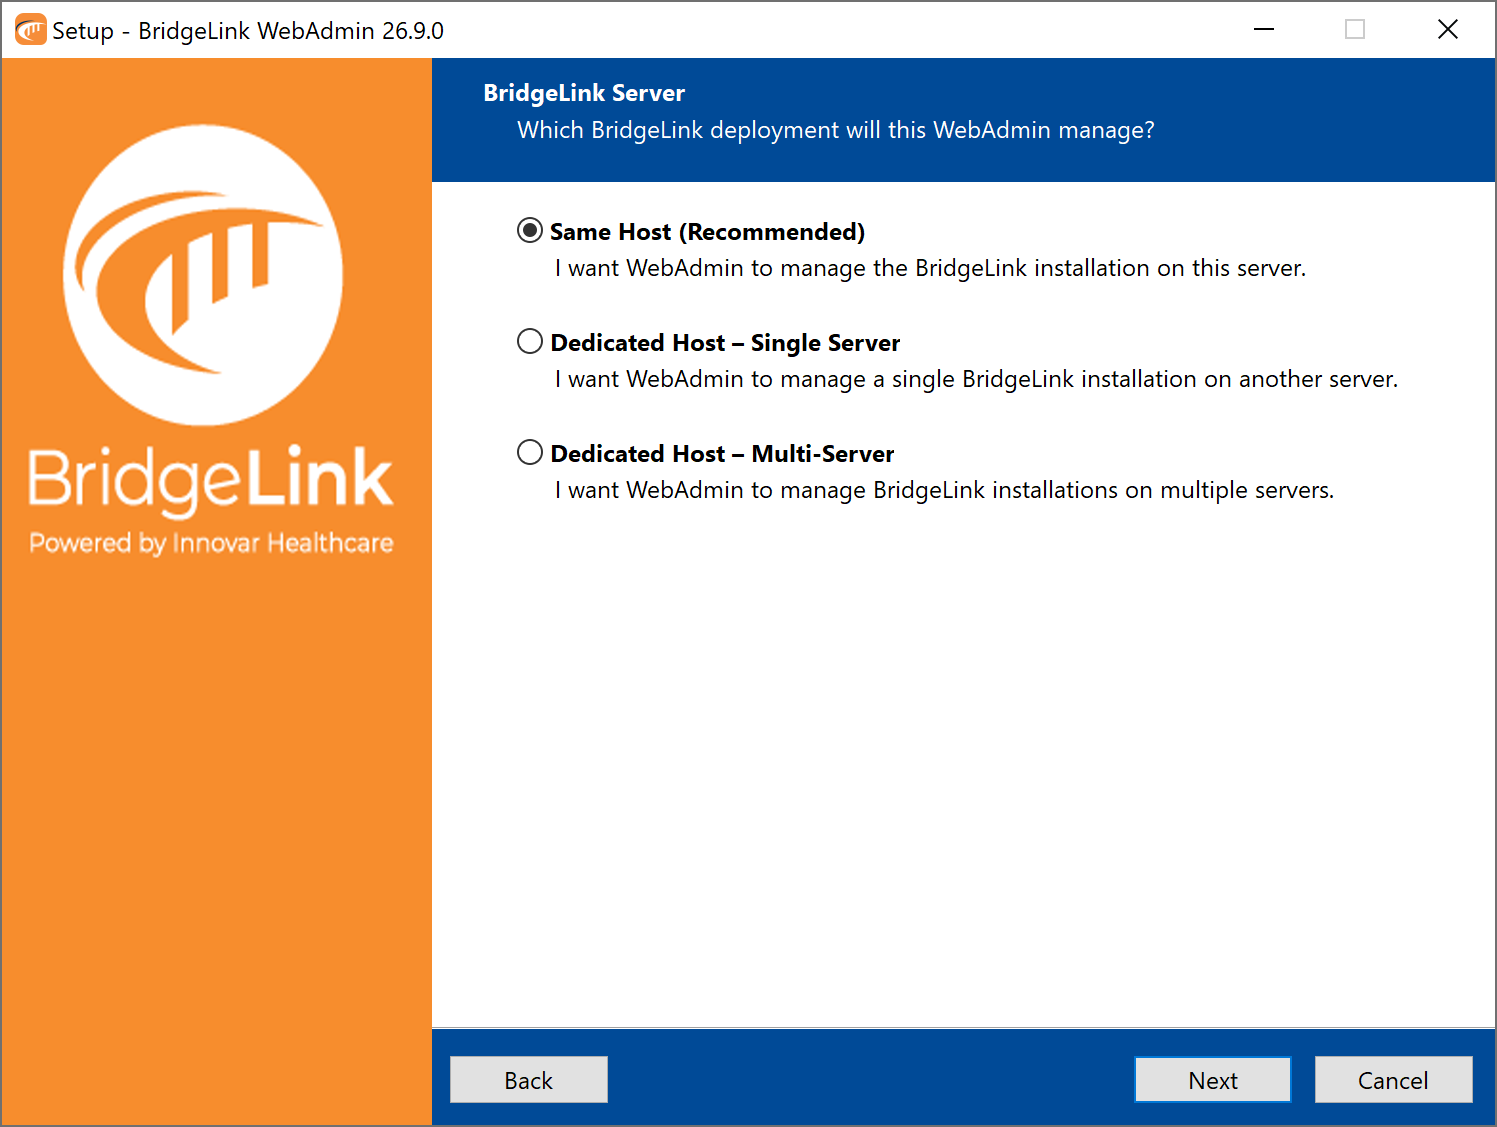
The wizard:
- Installs and starts the Windows service BridgeLinkWebAdmin, set to start with Windows
- Creates a self-signed certificate for WebAdmin at
C:\ProgramData\BridgeLink\certs\server.crtandserver.key, and trusts it on this machine - Adds the Windows Firewall rule BridgeLink WebAdmin HTTPS for port
8444
To put WebAdmin on a different machine, download BridgeLink WebAdmin Standalone from the download page, run it there, and choose Dedicated Host – Single Server with this server's address.
Sign In for the First Time
Sign in only after the BridgeLink database is connected and BridgeLink Service is running (see Starting BridgeLink for the First Time). Before that, WebAdmin cannot reach the server.
- Open the Windows Start menu and type
BridgeLink WebAdmin. - Under Websites, click BridgeLink WebAdmin. Your browser opens WebAdmin. Do not click the Best match result, BridgeLink WebAdmin (docs), which opens a folder.
To skip the Start menu, open https://localhost:8444 in a browser on this server instead.
- If the browser shows a certificate warning, click Advanced, then Proceed to ... (unsafe) in Chrome or Continue to ... (unsafe) in Edge. In Firefox, click Advanced, then Accept the Risk and Continue. Read the note after this step.
- In Username, type
admin. - In Password, type
admin. - Click Login.
- On Welcome to BridgeLink, leave Username as
admin. - In New Password, type a new password of at least 8 characters, with an uppercase letter, a lowercase letter, a number, and a special character such as
!,@,#,$,%or*. A hyphen, period or space does not count as a special character, and the password cannot beadmin. WebAdmin lists only the rules thatadminbreaks, so check your password against all of these. - Type it again in Confirm Password.
- The profile fields on Welcome to BridgeLink are optional; fill them in if you want to.
- Click Save & Continue.
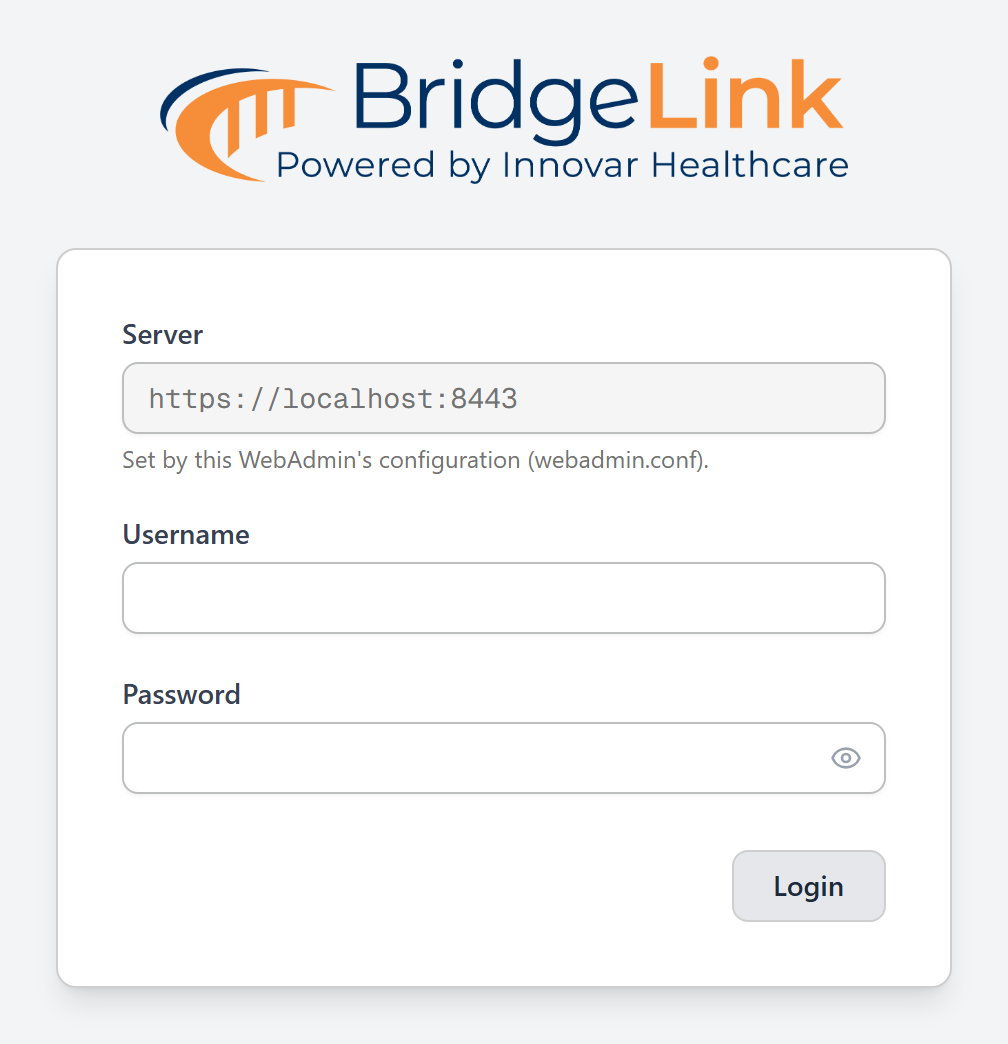
To open WebAdmin from another computer, go to https://your-computer-name:8444, using this server's name. It is the same address the BridgeLink WebAdmin shortcut opens here.
Stopping, Starting and Restarting WebAdmin
WebAdmin runs as the Windows service BridgeLinkWebAdmin, separate from BridgeLink Service.
- Click Start.
- Type
services.mscand pressEnter. - Right-click BridgeLinkWebAdmin and click Stop, Start or Restart.
WebAdmin writes its output and errors to service.log and service-error.log in the logs folder of its install folder, C:\Program Files\BridgeLink WebAdmin\logs. The BridgeLink WebAdmin Setup Guide lists every file the installer creates.
More WebAdmin Setups
For WebAdmin on another machine, one WebAdmin for several servers, your own certificate, and every setting, see the BridgeLink WebAdmin Setup Guide on the BridgeLink download page, https://www.bridgelink.net/download.
Finding the Server ID
Every BridgeLink server has a unique server ID, created the first time it starts. Plugin licenses are issued against this ID, so Innovar Healthcare asks for it when you license a plugin.
In WebAdmin
- Sign in to WebAdmin.
- In the left sidebar, scroll to the bottom and, under Help, click About BridgeLink.
If Update Available opens instead, click Got it, then click About BridgeLink again.
- Click the copy icon beside Server ID.
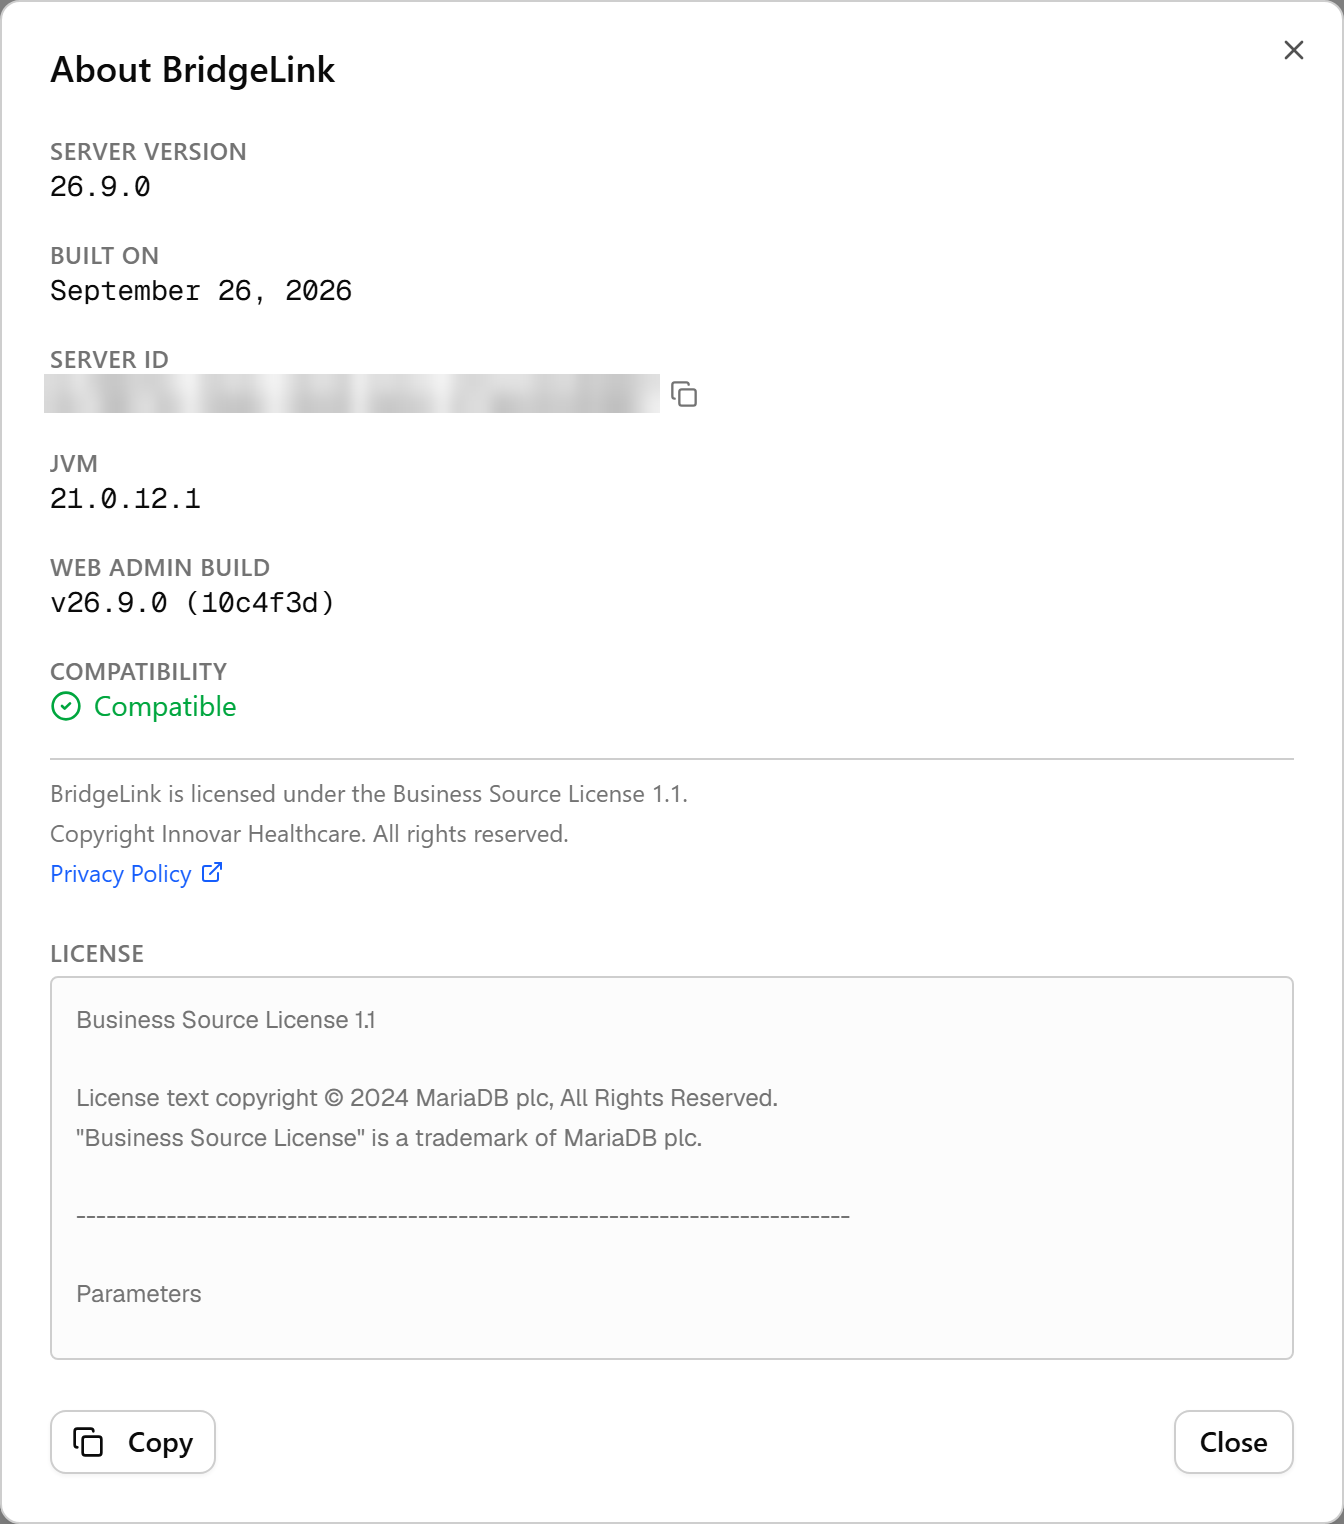
On Disk
The same ID is in C:\Program Files\BridgeLink\appdata\server.id, on a line that reads server.id = followed by the ID.
Back up appdata\server.id, appdata\keystore.jks and conf\mirth.properties from C:\Program Files\BridgeLink together. The keystore holds the key BridgeLink uses to encrypt data, and mirth.properties holds the keystore's passwords. If you rebuild the server and put the server.id file back before BridgeLink first starts, the server keeps its ID and its plugin licenses. Without the file, BridgeLink creates a new ID.
Replacing the Certificates
A new install uses two self-signed certificates (certificates the server creates for itself, which browsers do not trust), which is why browsers warn the first time. Before you use BridgeLink in production, replace them with certificates from your organization's certificate authority (CA).
| Certificate | Port | Who sees it | Where it lives |
|---|---|---|---|
| WebAdmin | 8444 | Every browser that opens WebAdmin | C:\ProgramData\BridgeLink\certs\server.crt and server.key |
| BridgeLink server | 8443 | WebAdmin and any program that calls the BridgeLink API | The mirthconnect entry in C:\Program Files\BridgeLink\appdata\keystore.jks |
Most organizations replace the WebAdmin certificate first, since that is the one users see in their browsers.
Convert a .pfx File to PEM
WebAdmin needs its certificate and private key as PEM files (text files that begin with -----BEGIN). Windows certificate authorities usually issue a .pfx file instead, and Windows has no openssl command of its own. Skip this section if your CA gave you PEM files, or ask the CA for PEM files instead.
OpenSSL comes with Git for Windows. These steps use its Git Bash shell:
- Open Git Bash from the Start menu.
- Go to the folder that holds your
.pfxfile, for example:
cd /c/certs- Extract the certificate, and type the
.pfxfile's password when OpenSSL asks for it:
openssl pkcs12 -in server.pfx -nokeys -out webadmin.crt -legacy- Extract the private key without a password on the key file:
openssl pkcs12 -in server.pfx -nocerts -nodes -out webadmin.key -legacyIf OpenSSL rejects the -legacy option, run steps 3 and 4 again without it.
- Open
webadmin.crtin Notepad and check that your server's certificate is the first certificate in the file, followed by any intermediate certificates.
Replace the WebAdmin Certificate
You need the certificate and its private key as PEM files. Put any intermediate certificates in the certificate file after the server certificate. The private key file must not have a password.
Name the two files something other than server.crt and server.key, and point WebAdmin at them in webadmin.conf. Each time you run BridgeLink-WebAdmin-Setup.exe again (for a repair, an upgrade, or the port fix in Troubleshooting), Setup deletes a server.crt and server.key whose certificate does not name this computer, and creates new self-signed ones. Files with other names, and the two lines in webadmin.conf, are kept. The steps below use webadmin.crt and webadmin.key.
Before you replace WebAdmin's certificate, read When a browser stops letting you click through under Sign In for the First Time in Installing WebAdmin. Make sure the browsers of WebAdmin users trust the new certificate, and that it names the address they type, for example your-computer-name. If a browser cannot open WebAdmin after the swap, undo it with the steps under To Undo the Swap.
- In Services, right-click BridgeLinkWebAdmin and click Stop.
- Open Command Prompt as administrator.
- Limit the certificate folder to SYSTEM and Administrators, so other users on this server cannot read the private key:
icacls "C:\ProgramData\BridgeLink\certs" /inheritance:r /grant:r "SYSTEM:(OI)(CI)F" "Administrators:(OI)(CI)F"On Windows in another language, the group names differ; use the language-independent form icacls "C:\ProgramData\BridgeLink\certs" /inheritance:r /grant:r "*S-1-5-18:(OI)(CI)F" "*S-1-5-32-544:(OI)(CI)F".
- Copy your certificate into
C:\ProgramData\BridgeLink\certsand name itwebadmin.crt. - Copy your private key into the same folder and name it
webadmin.key. Delete any other copy of the key that other users can read, for example in your Downloads folder. - Open
webadmin.confin Notepad from the same Command Prompt:
notepad "C:\Program Files\BridgeLink WebAdmin\webadmin.conf"- Add these two lines at the end of the file. Write each path without quotes: WebAdmin reads everything after the
=as the path, so quotes become part of it. If the file already hasSSL_CERT_FILEorSSL_KEY_FILElines, change them instead of adding a second pair.
SSL_CERT_FILE=C:\ProgramData\BridgeLink\certs\webadmin.crt
SSL_KEY_FILE=C:\ProgramData\BridgeLink\certs\webadmin.key- Click File, then Save, and close Notepad.
- In Services, right-click BridgeLinkWebAdmin and click Start.
- Open WebAdmin in a browser and confirm there is no certificate warning.
Setup keeps the two lines as long as both are set and both files exist. If you move or delete a file, Setup goes back to a self-signed certificate and says so on screen, or, in a silent install, in its log under C:\Program Files\BridgeLink WebAdmin\logs.
To Undo the Swap
If browsers cannot open WebAdmin after the swap, put the self-signed certificate back in use:
- In Services, right-click BridgeLinkWebAdmin and click Stop.
- In Command Prompt as administrator, open
webadmin.confin Notepad:
notepad "C:\Program Files\BridgeLink WebAdmin\webadmin.conf"- Delete the
SSL_CERT_FILEandSSL_KEY_FILElines. - Click File, then Save, and close Notepad.
- In Services, right-click BridgeLinkWebAdmin and click Start.
WebAdmin then uses the self-signed server.crt and server.key in C:\ProgramData\BridgeLink\certs again.
Browsers that opened WebAdmin by its server name with the new certificate refuse the old self-signed one. Fix the new certificate instead, or clear the browser's HSTS entry for the server name: open chrome://net-internals/#hsts in Chrome or edge://net-internals/#hsts in Edge, and use Delete domain security policies. In other browsers, clear the browsing data for that server name.
Replace the BridgeLink Server Certificate
BridgeLink keeps its certificate in a keystore file under the name mirthconnect. The same keystore also holds the key BridgeLink uses to encrypt data, so replace only the mirthconnect entry. Never swap in a different keystore file.
You need the certificate and private key as a PKCS12 file (a single file, ending in .p12 or .pfx, that bundles a certificate with its private key) and its password. The commands use keytool, which comes with the Java you installed. If Command Prompt cannot find it, run it from that Java's bin folder.
In the commands below, replace each value in angle brackets, including the brackets, with your own:
C:\certs\server.p12: an example path, not a file on your server. Use the path to your own PKCS12 file.<your keystore.storepass value>and<your keystore.keypass value>: the values ofkeystore.storepassandkeystore.keypassthat you note in step 7<your .p12 file password>: the password of your.p12or.pfxfile, which whoever exported it chose<the entry name from step 4>: the entry name thatkeytoollists in step 4
Type the real values. If you leave a placeholder or a stand-in such as STOREPASS in a command, keytool stops with "Keystore was tampered with, or password was incorrect".
- In Services, right-click BridgeLink Service and click Stop.
- Open Command Prompt as administrator.
- Go to the BridgeLink folder:
cd "C:\Program Files\BridgeLink"- List the entry name inside your PKCS12 file.
keytoolasks for the file's password and shows nothing as you type, not even dots. Type the password and pressEnter:
keytool -list -keystore C:\certs\server.p12 -storetype PKCS12- Copy
C:\Program Files\BridgeLink\appdata\keystore.jksto a safe place as a backup:
copy "C:\Program Files\BridgeLink\appdata\keystore.jks" "%USERPROFILE%\keystore.jks.bak"- In Notepad, click File, then Open, and open
C:\Program Files\BridgeLink\conf\mirth.propertiesby typing the full path in File name. - Note the values of
keystore.storepassandkeystore.keypass. - Remove the old certificate entry:
keytool -delete -alias mirthconnect -keystore appdata\keystore.jks ^
-storetype JCEKS -storepass <your keystore.storepass value>- Import yours as
mirthconnect:
keytool -importkeystore -srckeystore C:\certs\server.p12 -srcstoretype PKCS12 ^
  -srcstorepass <your .p12 file password> ^
  -srcalias <the entry name from step 4> ^
  -destkeystore appdata\keystore.jks -deststoretype JCEKS ^
  -deststorepass <your keystore.storepass value> ^
  -destalias mirthconnect -destkeypass <your keystore.keypass value>
Steps 8 and 9 print a warning that recommends migrating the keystore to PKCS12. Ignore it: BridgeLink reads the keystore as JCEKS, so do not convert it.
- In Services, right-click BridgeLink Service and click Start.
- Open
https://your-computer-name:8443in a browser and confirm the browser shows your certificate.
WebAdmin keeps working through the change, with no change to its own settings.
If BridgeLink does not start, or port 8443 does not answer: stop BridgeLink, run copy /Y "%USERPROFILE%\keystore.jks.bak" "C:\Program Files\BridgeLink\appdata\keystore.jks" in Command Prompt as administrator, and start BridgeLink.
The Data Pruner
BridgeLink keeps the messages each channel processes until the Data Pruner removes them. The Data Pruner is off on a new server, so turn it on before you send real traffic through BridgeLink; otherwise the database grows with every message.
It has two parts, and both have to be set:
- The schedule, for the whole server: in WebAdmin, in the left sidebar under Administration, click Settings, then the Data Pruner tab
- How long each channel keeps messages: on each channel's Summary tab, under Message Pruning. A channel whose pruning fields are blank is never pruned, even when the schedule is on.
Choose ages that match your organization's record-keeping rules.
Turn On the Schedule
- In WebAdmin, in the left sidebar under Administration, click Settings.
- Click the Data Pruner tab.
- Under Schedule, set Enable to Yes.
- Choose a Schedule Type and set when it runs: Interval runs every set number of hours or minutes, Time runs once a day, and Cron takes cron expressions. Once a day at a quiet hour suits most servers.
- Click Save.
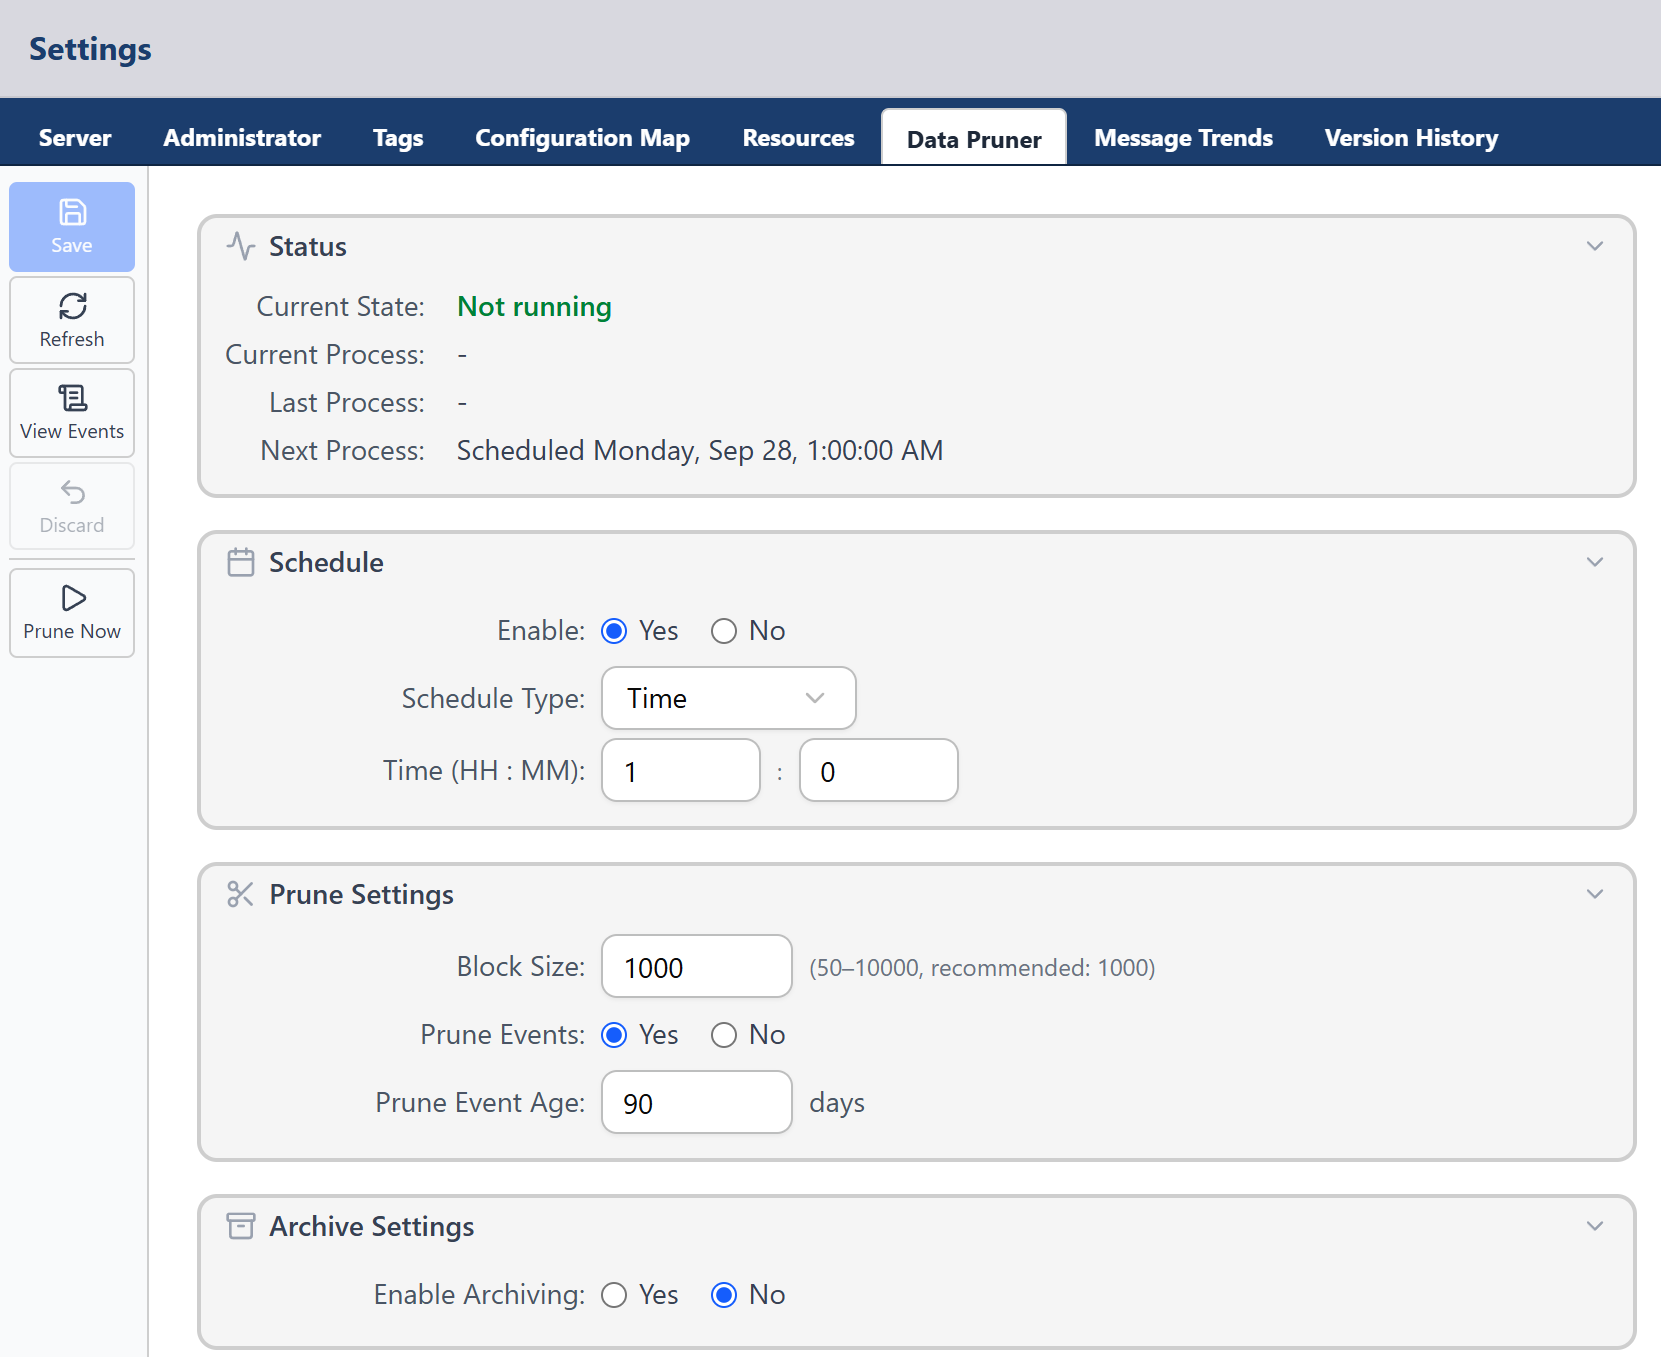
Set How Long Each Channel Keeps Messages
- In the left sidebar under Build, click Channels.
- Double-click the channel to open it in the channel editor.
- On the Summary tab, under Message Pruning, enter the number of days in Prune metadata after and Prune content after. Content cannot be kept longer than metadata.
- Click Save.
- Repeat for each channel.
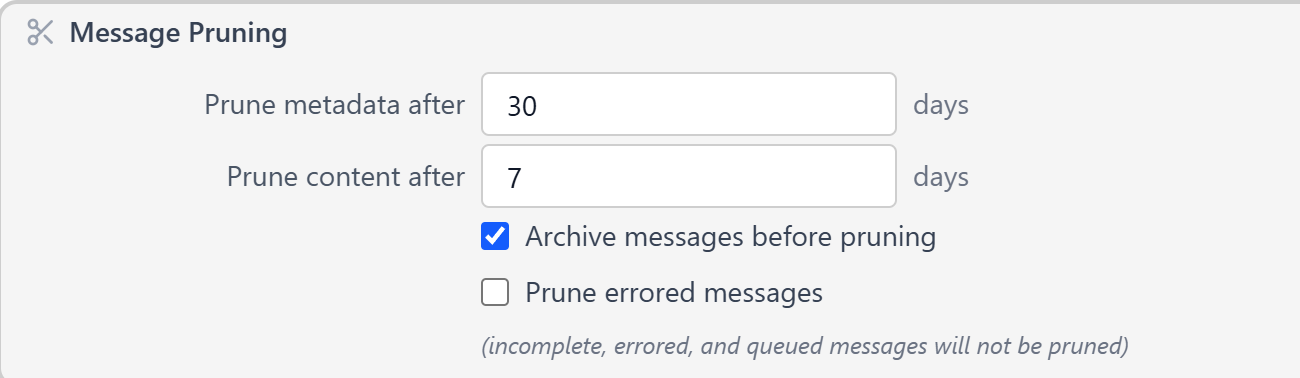
Incomplete and queued messages are never pruned. Errored messages are kept too, unless you check Prune errored messages.
Troubleshooting
| Symptom | Likely cause | What to do |
|---|---|---|
BridgeLink Service will not start: Services shows a progress bar, then a blank Status and no error, sc query blservice shows exit code 1067, and logs\mirth.log shows ERROR: BridgeLink is running as root/Administrator. | The service runs as Local System or as an account in Administrators | Switch the service to the virtual account or another non-administrator account. See Changing the Account After Install. Windows also records event 7034 for this case, so read logs\mirth.log to tell it apart from the Derby and database startup failures in the rows below. |
The service stops at once, and the log shows embedded Derby requires Java 21+ as of 26.9; upgrade Java or switch to an external database | The server is still on the default Derby database, running on Java older than 21 | Connect an external database. See Point BridgeLink at the Database. |
BridgeLink Service shows Running and answers on port 8443, but nothing new is written to logs\mirth.log | The service account cannot write to the BridgeLink folder | Check the time on the newest line inside mirth.log, not the file's modified time, which Windows leaves out of date while the file is open. Grant the account Modify on the install folder with icacls. See Changing the Account After Install. |
| The service will not start and Windows shows "Error 1069: The service did not start due to a logon failure." | The account's password is wrong, or it lacks the Log on as a service right | Re-enter the password on the service's Log On tab and click OK. Windows grants the right when you save there. |
The log shows "Error establishing connection to database, aborting startup". Services can keep showing Running until you refresh it with F5. | The database.url, login or password is wrong, or a firewall blocks the database port. SQL Server only: its certificate is self-signed, comes from an internal certificate authority, or does not match the host name in the URL, which BridgeLink 26.9 does not accept by default. | Check the four database lines in conf\mirth.properties and test the login from the BridgeLink server. See SQL Server and certificates in Choosing and Connecting the Database. BridgeLink retries twice, 10 seconds apart, before it gives up. |
The log shows Failed to load class of driverClassName null | The database value in conf\mirth.properties is not exactly postgres, mysql, sqlserver or oracle, for example postgres, with the comma copied from the comment line above it | Type the value only, with no comma. See Point BridgeLink at the Database. |
| WebAdmin sign-in shows "Could not reach the BridgeLink server. Verify the server address is correct and the server is running." | BridgeLink Service is not running, or WebAdmin points at the wrong BridgeLink port | Start BridgeLink Service. If you changed BridgeLink's HTTPS port, rerun BridgeLink-WebAdmin-Setup.exe and set that port on its BridgeLink Engine Port page. |
| The browser warns about the certificate | WebAdmin still uses its self-signed certificate | Click through the warning, or replace the certificate. See Replace the WebAdmin Certificate. If the browser offers no way to continue, it is enforcing HSTS for that name. See When a browser stops letting you click through under Sign In for the First Time, and To Undo the Swap in Replacing the Certificates to clear it. |
| Stopping or restarting BridgeLink Service hangs and Windows shows Error 1053 while the database is down | The service waits for the database connection | Start the database. The stop then finishes. |
On Java 21, every start logs a WARN line saying JVM default charset is UTF-8 but the host (native) encoding is Cp1252 | This is expected on a new install | No action needed, unless you import channels from a Windows server that ran Java 17 or earlier; then set server.defaultencoding = windows-1252 in conf\mirth.properties. |
For more WebAdmin problems, see Troubleshooting in the BridgeLink WebAdmin Setup Guide.
Support
Customers with an active Innovar Healthcare support plan can contact support at support@innovarhealthcare.com. Include the BridgeLink version, the package you installed, what you were doing, and the most recent part of logs\mirth.log. mirth.log can contain message content, which may include patient data. Remove patient data before you send a log, or ask support for a secure way to send it.